Showing posts with label Appliqué. Show all posts

Tuesday, November 19, 2013

DIY: Encrusted Statement Bracelet Made From Scraps

Things you need for this DIY:
❂ trim scraps! I used these, these, these and these
❂ white fabric or felt
❂ hot glue
❂ a snap
❂ needle and thread

Total time:
1 hour


I always keep scraps of trim because I can never bring myself to throw out anything shiny. This is a great project for using up the bits and pieces from other DIYs. You can easily make a show-stopping one-of-a-kind piece of jewelry!

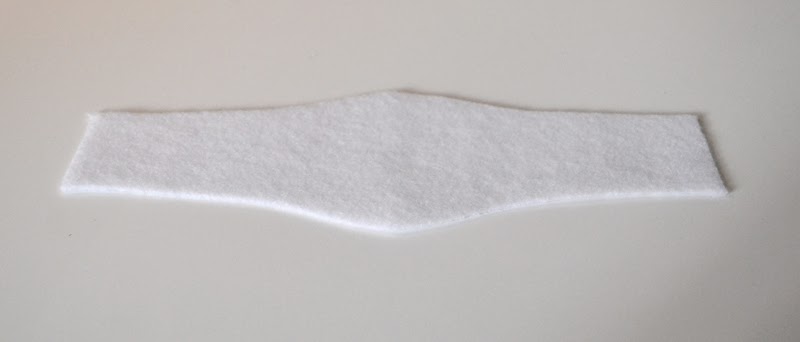

Cut your fabric into your desire shape. Make sure it will fit around your wrist with extra room for the snap.


Sew on your snap.


Embellish! This is the fun part.


I didn't really plan it out, I just started glueing. It was super fun and easy.

Sunday, September 29, 2013

Wedding DIY: Tulle Flower Hair Comb

Things you need for this DIY:
❂ tulle
❂ comb
❂ Zelda applique
❂ flowers
❂ needle and thread

Total time:
30 mins


So east and so romantic!


Cut five or six flowers out of your tulle.


Layer them


Arrange your applique and flower trim on top.


Sew it all together, then sew the comb on the back.


Done!

Tuesday, September 17, 2013

DIY Inspiration: Lace And Tulle Maxi Skirt

Even though making this would take some sewing skills, it's totally worth is. This skirt is so romantic and ethereal and is an easy day or night look. I'm totally gonna try it, what about you?


Shop this look:
Tulle (in various colors)
White lace applique
Black lace trim

Tuesday, September 10, 2013

Wedding DIY Inspiration: BHLDN Hair Accessories

Two of my best friends are getting married next summer and all at once I am back in the throes of planning and I love it! Weddings are so exciting. We so rarely get to live in such a fantasy world. Here are a few DIYable head pieces that will make your romantic fantasies come true!


Shop this look:
Josie wide rhinestone trim


Shop this look:
Madge rhinestone applique


Shop this look:
Chiffon rosebud
Organza open rose
Comb

Tuesday, June 25, 2013

DIY: Beaded Goddess Head Chain

Things you need for this DIY
❂ beaded twist emblem
❂ chain (one piece that fits snuggly around your head and one piece that fits over the median of your head)
❂ pliers
❂ glue

Total time:
20 mins


Take the longer piece of chain and using the pliers, connect the ends.


Then connect the smaller piece to opposite ends of your loop.


Glue the applique to the T where the two pieces of chains connect. All done!

Friday, May 17, 2013

Wedding DIY: Dangling Crystal Headband

Things you need for this DIY:
❂ Headband
❂ Bebe rhinestone appliqué 
❂ Rhinestone leaf trim 
❂ Rhinestone chain 
❂ Glue


First cut out a few different shapes from your trim.


Glue your appliqué to your headband and add your trim pieces.


Start glueing on you chain.


Make a loop that is big enough to dangle.


Add a few more loops and you’re done!

Wedding DIY: Art Deco Headband

Things you need for this DIY:
❂ Emblem appliqué
❂ 3' of ribbon
❂ Glue
❂ Scissors


This may be the easiest DIY ever!


Find the center of your ribbon and glue on the center of the appliqué. Continue gluing outward till it is secure. That’s it!

Monday, May 13, 2013

Wedding DIY: Daisy’s Crystal Headband

Things you need for this DIY:
❂ Nora rhinestone banding
❂ Zelda appliqué
❂ Rhinestone button
❂ Two 12” strands of ribbon
❂ Glue
❂ Scissors


First, glue one end of your rhinestone chain to the end of one strand of ribbon.


Repeat on the other end.


Add your appliqué to one side of your headband...


...and glue your button to the center of it.


Done!