


Showing posts with label Hair Accessories. Show all posts
Showing posts with label Hair Accessories. Show all posts
Thursday, November 14, 2013
Featured DIY: Veiled Headband
Obsessing over this simple little number from A Pair And A Spare. Get Some Russian Tulle Veiling in your favorite color and make this chic head accessory.
Wednesday, October 30, 2013
Three 15 Minute Halloween Costume To Make Between Work And The Party
If you are anything like me, you wait till the day of Halloween to pick a costume (I mean there are just too many choices!). Here are three you can throw together before you run to your party. Halloween is easy with a little help fomr Shine Trim.
Contemporary Princess:

Things you need for this DIY:
❂ wire
❂ wire cutters
❂ pliers
❂ scissors
❂ glue
❂ gold metalic lace


Make a loop the size of your head.

Cut a section of lace.

Bend a piece of wire to mimic the shape of your lace.
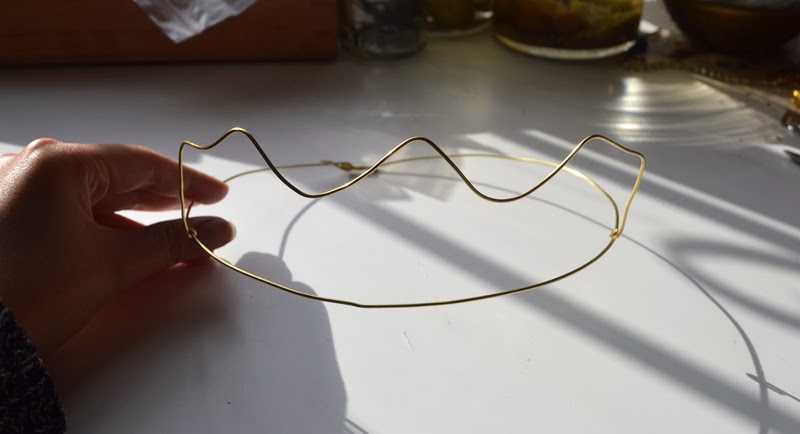
Attach to the loop.

Glue the lace to your wire.

Throw on an old prom/bridesmaid dress and wave to your adoring public!
Jewel Thief:

Things you need for this DIY:
❂ lots of jewels!
❂ clips
❂ safety pins


Attach your clips to your jewels and use the safety pins to attach them to the inside of your jacket. Throw on some black clothes and keep watch over your shoulder!
Runaway Bride:

Things you need for this DIY:
❂ hotfix rhinestones
❂ a robe
❂ an iron


Arrange your rhinestones to say "Bride" and iron them on the back of your robe. Grab your slippers and hit the road!

Contemporary Princess:
Things you need for this DIY:
❂ wire
❂ wire cutters
❂ pliers
❂ scissors
❂ glue
❂ gold metalic lace
Make a loop the size of your head.
Cut a section of lace.
Bend a piece of wire to mimic the shape of your lace.
Attach to the loop.
Glue the lace to your wire.
Throw on an old prom/bridesmaid dress and wave to your adoring public!
Jewel Thief:
❂ lots of jewels!
❂ clips
❂ safety pins
Attach your clips to your jewels and use the safety pins to attach them to the inside of your jacket. Throw on some black clothes and keep watch over your shoulder!
Runaway Bride:
Things you need for this DIY:
❂ hotfix rhinestones
❂ a robe
❂ an iron
Arrange your rhinestones to say "Bride" and iron them on the back of your robe. Grab your slippers and hit the road!
Sunday, September 29, 2013
Wedding DIY: Tulle Flower Hair Comb
Things you need for this DIY:
❂ tulle
❂ comb
❂ Zelda applique
❂ flowers
❂ needle and thread
Total time:
30 mins

So east and so romantic!

Cut five or six flowers out of your tulle.

Layer them

Arrange your applique and flower trim on top.

Sew it all together, then sew the comb on the back.
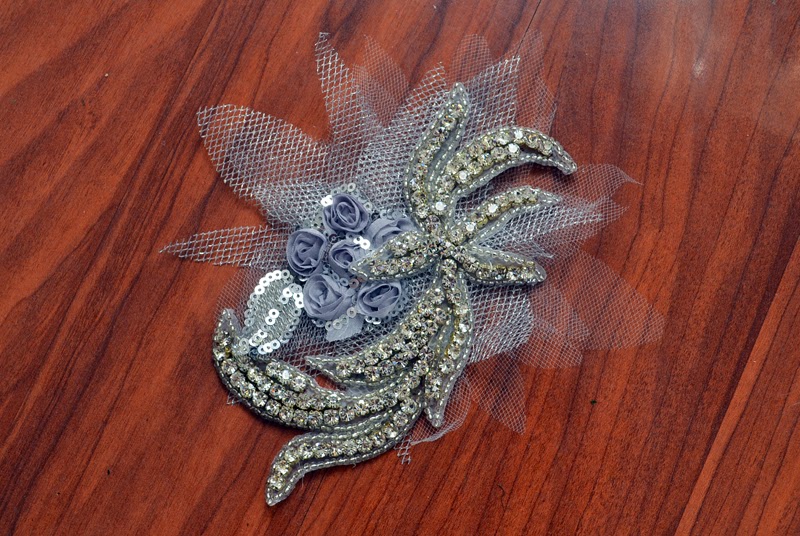
Done!


❂ tulle
❂ comb
❂ Zelda applique
❂ flowers
❂ needle and thread
Total time:
30 mins
So east and so romantic!
Cut five or six flowers out of your tulle.
Layer them
Arrange your applique and flower trim on top.
Sew it all together, then sew the comb on the back.
Done!
Thursday, September 12, 2013
Wedding DIY Inspiration: Pearl And Crystal Head Wrap
This headband from Nordstrom is sparkly and lovely and looks suspiciously easy to make using the Madge Rhinestone Applique and a little pearl trim.

Shop this look:
Madge rhinestone applique
Rhinestone pearl banding
Shop this look:
Madge rhinestone applique
Rhinestone pearl banding
Get The Look: Free People Headband
Why do I swoon over everything Free People sell? Get the look of this stunning headband (that would be perfect for a bride or a bold bohemian babe) with a piece of light grey silk and the Autumn Rhinestone Brooch or the Five Leaves Brooch.

Tuesday, September 10, 2013
Wedding DIY Inspiration: BHLDN Hair Accessories
Two of my best friends are getting married next summer and all at once I am back in the throes of planning and I love it! Weddings are so exciting. We so rarely get to live in such a fantasy world. Here are a few DIYable head pieces that will make your romantic fantasies come true!

Shop this look:
Josie wide rhinestone trim

Shop this look:
Madge rhinestone applique

Shop this look:
Chiffon rosebud
Organza open rose
Comb
Shop this look:
Josie wide rhinestone trim
Shop this look:
Madge rhinestone applique
Shop this look:
Chiffon rosebud
Organza open rose
Comb
Friday, July 5, 2013
Wedding DIY Inspiration: Feather Details From Real Weddings
On your wedding day, it's the groom that catches your attention but it's the sweet little details that make it all the more fun.


 (images via pinterest)
Shop this look:
Feathers
(images via pinterest)
Shop this look:
Feathers
Tuesday, July 2, 2013
DIY Inspiration: Flip Bun And Rhinestone Barrette
This gorgeous look from The Beauty Department makes me sad I chopped all my hair off. :(

Shop this look:
Batch leaf rhinestone applique
Comb
Shop this look:
Batch leaf rhinestone applique
Comb
Tuesday, June 25, 2013
DIY: Beaded Goddess Head Chain
Things you need for this DIY
❂ beaded twist emblem
❂ chain (one piece that fits snuggly around your head and one piece that fits over the median of your head)
❂ pliers
❂ glue
Total time:
20 mins


Take the longer piece of chain and using the pliers, connect the ends.

Then connect the smaller piece to opposite ends of your loop.

Glue the applique to the T where the two pieces of chains connect. All done!


❂ beaded twist emblem
❂ chain (one piece that fits snuggly around your head and one piece that fits over the median of your head)
❂ pliers
❂ glue
Total time:
20 mins
Take the longer piece of chain and using the pliers, connect the ends.
Then connect the smaller piece to opposite ends of your loop.
Glue the applique to the T where the two pieces of chains connect. All done!
Thursday, June 13, 2013
Featured DIY: Summer Lace
Check out these five beautiful DIYs that are perfect for summer accessorizing.
 (Via Victoria Brikho)
 (Via See Kate Sew)
 (Via Plus Kawaii)
 (Via Kittenhood)
 (Via Plan B)
Shop this look:
Lace
I recommend:
Wide beige cotton lace
Cotton lace trim
Gold metallic lace
Black floral Venise lace
(Via Victoria Brikho)
(Via See Kate Sew)
(Via Plus Kawaii)
(Via Kittenhood)
(Via Plan B)Shop this look:
Lace
I recommend:
Wide beige cotton lace
Cotton lace trim
Gold metallic lace
Black floral Venise lace
Subscribe to:
Posts (Atom)